12.29.2009

The Actinic Bulb


An actinic light was added to the system, purely to enhance the colors of the inhabitants. It also helps get the photo-period up and running faster without having to run the 250 watt Metal Halide light 12 hours a day.

I found a cheap 24" strip light with legs that fit the side of the cube perfectly (After a bit of customization with a hack saw). The bulb is a single 65 watt PC fluorescent lamp which is perfectly fine in this instance because the 250w halide does not need any help lighting the tank.

Since the addition of this light a slew of benefits have been identified. Mainly in reducing the amount of time the metal halide light is running, the obvious perks include, a lower hydro bill, less heat in the system, less potential for unwanted algae growth, more Coraline algae growth in the low light actinic only period. Currenly the Actinic light runs 11 hours on 13 hours off and the halide lamp runs 9 hours on and 15 hours off. The refugium light is on opposite the halide to keep PH balanced and the 3 watt blue LED light stays on 24/7.

It's true the Actinic bulb did add a lot visually to the system, but all the hidden benefits of running actinics seperately from daytime lighting make this type of lighting setup almost essential to keeping any reef.


- A.

6.22.2009

The Growth


June FTS...
That is all.

- A.

5.31.2009

The Morning

Recorded over several mornings, this is a stop motion photography time lapse of the aquarium corals reacting to the 20k metal halide lights turning on. Several angles were photographed each morning until the desired shot diversity was captured.


5.26.2009

The Evolution


The system is a only a mere four months old today yet its growth and progress have been amazing over the past 16 weeks. Patience and attention to detail during these infantile stages has proved to be effective.

The following is a visual representation of the Nano's evolution during the past quarter year,


January 15th, 2oo9

Feb 15, 2009

Feb 22, 2009

March 4th, 2009

April 1st, 2009

May 24th, 2009

- A.

5.25.2009

The Fan


As the summer months get warmer and warmer, as did the water in this delicate system. Running a Nano system with a total of 5 pumps and a whopping 250 watts of light in 29 gallons, too much heat is obviously a possible issue. A high room temperature combined with the heat produced by the submersible electronics creates an environment very likely to get hot. Resulting in unhealthy inhabitants and an unstable aquarium.

Over the past week it has been too cool to run air conditioning, yet to warm to not be cautious about the rising temperature of the system. Shopping for chillers proved pointless and too pricey, and running full A/C 24/7 would just run up the power bill.

As a quick and incredibly easy fix an $8 mountable fan was attached to the wall behind the tank. Reluctantly purchased from Wal-Mart (forcing me to disregard political and moral commitments), this fan has proved to be quite possibly the best investment made for this system thus far. The fan also comes with a clip that can be screwed to the wall.

The temperature has dropped dramatically and is stable (From 85-87 degrees to a stable 77 with the lights on, and 76 in the evening. The only downside is the inevitable quick evaporation of the water. The silent fan cools the light, water surface, and back side of the tank creating an ideal cooling method that was both cost effective and energy efficient.

I recommend looking into a cheap fan option before doing anything dramatic for chilling or even losing livestock this summer.

-A.


5.24.2009

The Big Move


As May 1st came and went, as did the inevitable moving day which required also moving the Nano Aquarium. Although the new house and the tank relocation was literally down the street and around the corner, the amount of precision, patience and planning required to effectively move the tank was enormous. Moving the 29g cube proved quite flawless with the whole mission wrapping up in about 1.75 hours.

Although the steps required to get the tank and its huge amount of contents from point A to point B seemed daunting, but with the help of another reef-keeper, I was able to quickly move everything in two trips. In this time I also had to re-aquascape, place coral, and transfer all the inverts and fish. All of this which was done in a careful manner to avoid shock, and re-cycling the tank ecosystem.

The motions needed to execute the move can be categorized into 4 groups. I hope these steps will help anyone who has the unfortunate but achievable task of moving a nano size aquarium in the future.

#1. Preparation: The preparation consisted of a few simple tasks.

a) About 9 gallons of salt water (30% of the system) was prepared a couple days before the move in the same way a typical water change would be prepared. (Heat, water motion, bubbles for PH balance).

b) A location was chosen in the new house before the move was started so carrying times and the transfer required no on the fly decision making.

c) Purchase, (or in this case borrowing) of several clean buckets for transfer of water, and live-rock.

d) Purchase of large ziplock (or no-name) freezer bags to hold all the corals and fish which differ in size and shape.

e) Packing of any additives, food, supplies, tools, test kits,
etc. and anything else that can be moved before the tank and livestock itself. This saves time leaving only the bare essentials which will be moved all at once.

#2. Livestock Removal:
a) This step requires the diligent bagging of coral. By leaving the tank running the water could still circulate and filter as all 20+ species of coral were carefully removed from the system and placed in bags containing tank water.

b) The larger inverts, crabs and two clownfish were left in the tank for removal during the water and rock removal stage.

c) Lastly the cheato was removed and bagged also to avoid die-off.

#3. Water and rock Removal: With the tank now "coralless" the removal of rock and water began. The filtration and water motion was left on until now so the water was still crystal clear. These simple steps are in an attempt to preserve as much of the mature water without stirring up sediment or exposing live-rock.

a) As the water was syphoned into buckets, the live-rock was added into these buckets. This ensured the cured live-rock only leaves the water for a second or two before being fully submerged back in the bucket. This process requires careful removal to avoid disturbing the sand bed releasing semi consumed nitrates and crud into the water column. Although live-rock can survive exposed for quite some time. I chose to keep every piece submerged for the entire process keeping the bacteria, worms, pods, and coralline algae alive again in an attempt to avoid the mess of another tank cycle.

b) The trick for the next step was to first stop the syphon at about 60% to remove the fish and inverts. With the majority of the rocks and water gone it is much easier to catch the quick fish limiting the amount of induced stress.

c) As the water level approached the bottom of the tank, it was essential leave at least 1 inch of water in the tank and not touch any live-rock that was anchored in the sand bed. This keeps the water clear and anaerobic bacteria deep in the bed undisturbed further avoiding a second cycle.

#4. Relocation of Tank and Equipment: With all equipment in a milk crate, all livestock bagged and stored in containers and both the rock and water filling another several buckets, the move was about to begin. Luckily the tank and stand fit perfectly into the backseat of a VW Jetta and we were on the road.

a) With the live sand, an inch of water, and about 6lbs of liverock sitting on the tank base, the
empty 29g Biocube was a bit heavy but nothing two lifters could not handle with ease. While manually supporting the base of the tank, we quickly moved the tank, stand, equipment, livestock, and any other loose ends in two trips.

b) The aquarium was carried into the new house carefully to avoid disturbing the sand bed and base live-rock, and placed on the stand.

c) The heater, powerheads, skimmer, and fuge light were all in place and the aquarium was positioned levelly and appropriately to avoid direct sunlight and open vents, while meeting all the other aesthetic and practical criteria of home aquarium placement.

#5. The Aquascape and Re-addition of Tank Contents: At this point the coral and livestock have been in bags for about 45 minutes. To avoid over-stress, it was time to refill the tank and get the creatures back into their environment as soon as possible.

a) Instead of pouring water into the tank which would create turbulence and disturbance of the sand bed, an extremely clean small glass plate was placed on the sand bed, and water was pumped from the bucked into the tank landing smoothly on the center flat plate surface. The pump and plate are extremely effective in diffusing the water current allowing the water to fill the tank quickly without creating unwanted current and disturbance. Although it would be
much quicker to pour the water directly into the tank, this delicate approach is just another quick fix to keeping the water pure and the sand bed untampered with.

b) As the water level rose, the rocks were added back into the crystal clear tank in the desired aquascape (Which turned out almost identical to the previous scape, with minor adjustments
for more SPS additions and less wasted vertical rock surface.)

c) Heres where the preparation of several gallons of salt water comes into play. To avoid pouring the polluted bag water containing the stressed fish, coral and inverts into the tank,
fresh mixed water was added which worked out to be about a 25-30% water change. It is incredibly important to not overlook this step. If all the water that has been sitting unfiltered for about an hour with coral chemicals and ammonia was poured back into the tank it could create a big mess possibly resulting in a quick crash or damage to the tank's ecological balance and all its contents.

d) With the tank almost 100% full the pumps and skimmer were turned back on and the fish bags were acclimatized to the current water temperature. Finally the fish were released happily into the system with no signs of shock or irritation.

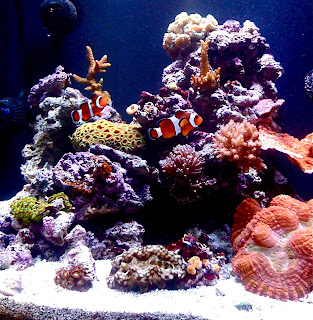
e) Next all coral was carefully placed in the desired locations which is quite similar to the previous setup. A Zoa and Acan garden was arranged, and a small forest of SPS frags were placed near the top of the rock structure. Although an attempt to place the coral properly was made it was more important to get everything back in the system quickly, providing an opportunity to aesthetically arrange the specimens would follow during the next days.

1 hour and 45 minutes later the tank was looking better than ever with the coral all in place and the water remained completely clear for the entire process. The halide lamp was remounted
which turned on the next morning to light a relatively undisturbed system full of open healthy corals and a seemingly undisturbed ecosystem.

Strontium, Magnesium, Calcium, and Alkalinity tests were taken immediately for a reference to readjust the parameters back to normal over the next week or two.

A week after the move the system was still incredibly stable seeing absolutely no rise in ammonia, nitrite or nitrate and even the coralline algae was completely unaffected. Some minor diatom growth was seen for about 1 week after moving day but has now disappeared completely 3 weeks later. All corals are still growing rapidly with the success of this system unrivaled to any salt water experience in my past.

Unfortunately and regretfully during the intense time sensitive process I neglected to take mny pictures of the steps along the way but I hope this article is helpful.

Sorry for the "long winded-ness" of this post but I feel the strategy and methods used to seamlessly relocate a fragile reef system are essential to any aquarist who may need to undergo a move.

4.08.2009

The Acanthastrea Additions


Here is an April FTS, and some closeups of the new corals.

Over the past couple weeks several new coral species have been added to the display. Several SPS frags have been added to the upper portions of the rockwork, a few more colorful zoa frags have been placed in the lower portion, while two beautiful colonies of Acanastrea have been placed on the sand bed.

As all parameters are in check the SPS frags are growing already and their colors have in fact become more vibrant.


4.05.2009

The Drip


The acclimation process is one that many aquarists overlook or rush. After a road-trip to shop some incredible frag tanksin Guelph (http://www.fragalot.ca) the drip in process becomes an essential step in the purchase of any marine livestock be it coral inverts, or fish.

To properly drip in the new species, a clean bucket has been elevated and placed beside the aquarium. Airline tube is attached to a valve which regulates the amount of water passing through the tube. A siphon is started through the airline tube which slowly mixes the
aquarium water with the water from the coral's previous system.

The idea is to slowly acclimate the coral to the same water conditions, and temperatures reducing stress greatly. This process is continuedfor an hour or two depending on the species while discarding water from the bucket so eventually the contents are very close to the water in the display.

There are hundreds of methods for livestock acclimation, this just happens to be the method deemed most effective and efficient. Some would argue a quarantine tank is necessary for coral addition, but due to the reputable source of coral purchase.


4.03.2009

The Video

Here is short video that has been recorded of the aquarium. (Click HQ to see an better quality version)


The 250 watt 14k bulb that had been lighting the system since its establishment has just been switched with a new 20k XM bulb and the purple and blue results are clearly visible in this video.

Finally color is arriving in a couple of the SPS frags which had turned completely brown in their previous owner's tank. This color has been coming back slowly for the past couple months, but it is really quite noticeable under the bluer light.

No major updates have been made to the system other than the addition of a few frags. In the last month all corals have shown drastic growth and progress.

3.21.2009

The Recap

The nano system is still running strong with no issues whatsoever. All of the corals are growing steadily, and the fish are healthy. The filtration system is flawless leaving crystal clear water, with literally no harmful contents. By blasting the rocks with a turkey baster every few days, the filter floss catches any buildup of debris that could store nitrate. Filter floss, the remora skimmer, a macro algae refugium, a bag of carbon, and one unit of chemipure elite, have worked together diligently to create an ideal environment for the inhabitants.

The chemipure elite will need a change soon. Although the package rates the media at 4-6 months, with this bioload it would be unwise to leave it for longer than 4 months. In the refugium the cheato has grown to fill the entire second chamber requiring frequent trimming to ensure space to grow.

Adding an auto top off systems and building a custom media rack are the next two steps that will need to be taken.

The evaporation on a topless nano with 250 watts of halide light is far to frequent, if the tank were left unattended for a couple days the water level would drop exposing the cheato. An ATO will solve this problem.

The custom media rack will fit into the middle chamber dividing it into two sections. THe first section will be a ladder type setup forcing the flow to fall down through two bags of media.
A baffle separating section one and two will direct the water back up into the refugium section allowing the water to flow back down through the cheato naturally.

Zoanthids, and mixed sps frags will be added to the system periodically for the next few months while the constant coral growth will eventually fill the reef.

Although growth and color is great with the 14k XM bulb, a bulb with a 20k temperature will be replacing the bulb in an attempt to bring even more vivid coloring to the system. With no actinic bulbs the use of a 20k light will be acceptable middle ground for coral lighting.

All in all the system is stable purely based on the diligence and patience applied in the maintenance and initial setup process. The upkeep of additives, coral feeding, and 10% weekly water changes has been with out a doubt essential to the progress of all species in the system.

3.09.2009

The Look Pt. 2

Some coral was added... some recent pictures... thanks to Ryan at Aquatic Kingdom in Mississauga for the great prices... that is all.

3.07.2009

The Look

Here are several photographs taken quite recently. They show some of the overwhelming color one can see when observing the aquarium. Parameters are now stable and significant coral growth is already apparent on all species. Specifically the SPS frags are growing at a rapid rate.

The photos are taken under a 14k XM Metal Halide Lamp with a digital SLR no other lighting supplements are present...

3.04.2009

The Oscillaris Pair

Due to the exceptionally stable conditions of the Nano system, and the need to finally shut down, and sell the 55 gallon "transferee" system, two paired Oscillaris Clownfish were recenty added to the Biocube.

The drip acclimatization method was used to delicately, and patiently prep the two fish for the switch. With Salinity and PH relatively exact in each system, and virtually no traces of Ammonia, Nitrite or Nitrate in either of the water columns, the fish adapted quickly to the new, smaller space. The Clowns indulged immediately among the wavy tentacles of the purple torch coral which resides in the center of the aquascape.

By "hosting" in the animated Torch, the Clowns offer the same gratification as if they were in an anemone, without all the dangers of housing one in such a compact system.

The fish have been in the system for three days with no sign of a small re-cycle, and no change in water parameters. The two tank-mates will be fed minimal portions every other day on a mixed diet of Omega One flake food and rinsed Mysis shrimp.

The paired Clownfish will be the only addition of fish for a indefinite period of time, as coral addition, collection, and propagation is the primary focus of this reef system.

3.01.2009

The Moonlight

Adding moonlighting to any system with a suspended HQI pendant can be a difficult issue. Although some may argue the "nightlife stimulus effect" is essential to any reef ecosystem, the actual beneficial properties of LED moonlights is very unclear to aquarists, and is heavily debated. With this in mind the choice to subtly light this Nano system throughout the night was purely based on aesthetic preference while catering to the practicality and desire of late-night marine observation.

Making a choice purely based on aesthetic preference then poses the problem of how to make such an addition to the system while keeping the equiptment placement discrete, simplistic and visually appealing.

To solve this problem a single coralife 1 watt LED moonlight was mounted directly to the hanging Metal Halide Pendant with a 125 degree bracket. The bracket was mounted to the pendant with the stock screw which was already in place holding the Halide light's framework together. The slight angle creates a diagonal beam that falls on the aquarium contents much like a beam of moonlight from a single direction in the sky.

By mounting this light to the rear of the pendant it is undetectable from the front of the system completing the requirements for a discrete equipment modification. This add-on now enables the contents of the Nano system be seen all night in a distinct blueish glow.

Regardless of whether or not these LED choices will encourage coral spawning and growth while stimulating nocturnal species, the addition of a LED moonlight is essentially a welcomed perk as the 29 Gallon Cube now has a visual pop during the late night twilight and into the early hours of the morning.