1.16.2010

The Glow

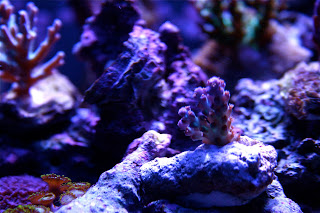
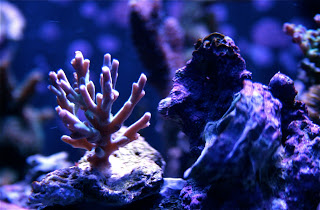
A few shots under actinics only.

- A.

1.15.2010

The Frags

Several SPS frags were added to the system. The large red Lobophyllia was sold to create room for smaller frags so a bit of an re-aquascape and a coralscape took place. Here's a few shots of the frags and the new FTS.


1.13.2010

The Vortech


A Eco-Tech Vortech MP10 wavemaker was recently added to the aquarium. This anticipated addition comes in an exquisite package including all the parts you need to convert your water motion setup into a lifelike ecosystem.

These little pumps cost a fair bit of change, however the reviews and user feedback is overwhelmingly positive.
Of course in a nano setup where every inch counts and more importantly every degree of heat counts, an all in one wavemaker pump that has a tiny in tank footprint and virtually no heat transfer is almost a must.


The pump took a few minutes to set up, and was up and running in no time. The pump tank mount was applied to the glass to prevent falling damage, and a provided rubber spacer was placed between the magnets to ensure no damage is done to the motor due to thin Biocube glass. The included instruction manual obviously provides a step by step and the directions are incredibly easy to follow.

After a few seconds of alignment and playing with the pump settings it was time to begin programming wave modes. Currently the pump is running in "Short Pulse Mode" which is one of several modes including "Reef Crest Random," "Lagoon Random," "Constant Speed," and "Long Pulse."

The adjustable"Short Pulse" mode was timed to generate a pulsing wavelike turbulence used to simulate the swaying motion of coastline reef. The mode uses a repetitive burst of current that, with a little tuning, can be synced with the rebounding waves to create a visible motion across the aquarium. Originally the "Reef Crest" mode was selected as an operating mode, but if your system is physically stable with short pulse you can get a little wave bouncing back and forth in your tank meaning it's not just your pump doing work as the momentum of the waves make everything sway.


The interface could not be easier with a glowing color coded LED light identifying the modes, two buttons for mode and set functions, and a knob controlling pump power and wave frequency.

The pump is capable of pushing over 1500 GPH and in the 29 gallon tank running at half power is more than enough.
Even more importantly the pump has a "feed" and "night" mode. Feed mode automatically reduces the pump power to almost zero for ten minutes while you feed then it instantly kicks back into its cycle ensuring no food gets blown into unwanted areas.

Night mode is even better, this time programmable mode prompts the pump to enter night mode which runs the pump at a constant low speed giving your corals and fish a rest when the lights are out.

All and all, it is too early to tell if the pump will greatly improve life for those living in the 29G Cube, however at first glance it's an incredible little gadget and is a must have for anyone with a little extra cash and a dedication to their aquarium.

- A.

1.12.2010

The Candycanes

Another photo.

- A.

1.10.2010

The Black Clowns


Just a photo.

- A.

1.08.2010

The Media Rack

Recently the system has been experiencing problems in the rear filtration chambers. Currently there is a unit of Chemi-pure Elite sitting on the bottom of the tank. Not only is it quite likely that not much flow is actually running through the media, rendering it's duties almost useless, but also the bag often gets sucked into the gap between the middle and return sections. This creates a jam clogging the flow and ultimately creating larger problems. Detritus gathers possibly leading to nitrates, water begins flowing up and over the dividing walls and the return pump sometimes blows air because water is not entering the last chamber fast enough. With the media at the bottom of the middle chamber it is impossible to switch out the media or clean it without disturbing the entire the refugium.

A simple DIY solution is the answer. To fix this problem a media rack will be built to create a waterfall effect when the water enters the middle chamber.

Please see Lighting the Refugium for the original fuge design as this will be an addon.

Step One: Gather Tools. Some wire cutters, Scissors, Plyers, Lots of eggcrate, a tape measure, and nylon strips are all needed.

Step Two: Measure and Cut the Eggcrate. 4 total pieces are needed to be cut. Find out the width, height and length dimensions of your middle chamber and cut the pieces accordingly. You will be cutting pieces to cover the narrow side and bottom of the rectangular space

Each cube brand and volume is different so I will not post specific measurements to avoid confusion. The goal is to create an "L" shaped rack that is slightly smaller than the space, which will sit where the bio-balls used to sit in the middle chamber.


Step Three: Strap it Together. Nylon strips were used for a quick and easy way to assemble the rack, however epoxy or marine safe glue would also work just fine. When you have the correct width and height for the bottom and vertical pieces connect them with the strips.

Your rack is beginning to take shape. Make sure your vertical eggcrate pieces are about one square skinnier than the bottom piece. Because of the lip on the backside of Nano/Bio Cubes you will need to tilt the rack to get it in.

A square "ladder portion" was added to the build in order to have the media sit higher in the rack. This also allows for stacking media and it also makes the rack stable. This ladder portion is a square with all sides equalling the width of the vertical portion.

As the second vertical piece is attached you create an "H" shape within your "L". With this step the rack is basically complete. While making sure the nylon strips are tight you can trim the tabs off and your eggcrate creation should look something like this...
The bottom of the rack should be a little less than the and length and width of your middle chamber while the height should be equal to the distance from the old false bottom t0 the top of the dividers.


Step 4: Insert the Rack and Media. Gently insert the rack into the middle chamber of your aquarium. Chances are you will have to wiggle it a bit to get past the lips and ridges that were used to hold the stock filtration in place. Hopefully you measured carefully because if you did not you will certainly find out now.

The rack should sit comfortably on the two ridges near the bottom of the chamber leaving a gap between the bottom of the tank and the bottom of the rack. (This is where the bio-ball drip tray used to sit when you bought the tank.) Once the rack is all the way in it should fit nicely in the middle chamber. Now the media is ready to be placed.

This method basically divides your middle chamber allowing chemipure, phosban, and/or carbon to be run in a bags while still leaving enough space to house cheato. As the water leaves your display it creates a tiny waterfall into the middle chamber and now that waterfall flows directly through whatever media you choose to run. Even more importantly the current created by the waterfall effect is absorbed by the media bag allowing your cheato and Fuge dwellers the calm low flow needed for refugium conditions.

Obviously reactors and mechanical filters are the more direct way to force water through a desired media, but in a small aquarium where pumps and heat are always concerns, this is a natural way to direct flow without spending much money or adding electricity into the mix.

-A.


1.04.2010

The Colour


Title is self explanatory.

- A.

1.03.2010

The New Year


Updates have been scarce over the past few months, however all is well in the system. A few photos were taken today to show the great deal of growth. Also the older pair of perc. clowns were exchanged at the LFS for the current pair of black clowns.

In a week it will be one year since this tank was just beginning its cycle. And the progress is exceptional. The Zoa garden has filled out, the SPS frags are beginning to dominate the upper portion of the rock work, and the color diversity keeps growing as more unique corals are added to this intricate aquarium.


- A.

1.02.2010

The Iodine Dip


Recently the Acan in colonies began receding rapidly in the aquarium. This is obviously an unfortunate problem, however there is a hopeful remedy.

After extensive water testing and maintenance review,
the problem was narrowed down to a probable LPS bacteria infection. After a few hours of reading, it was identified that the exposed skeletons of the Acans all had a similar pink tinge, meaning a bacterial infection was most likely the problem. When the colonies were purchased 6 months ago they were in poor condition and were nursed back to health. Perhaps the infection was dormant for this period as nothing was added to the aquarium that may have introduced a new infection. The exact origin is unclear at this time but is apparently common in LPS corals and can do rapid damage out of nowhere.

To quickly fight the infection an Iodine Dip solution was prepared. This is the second Iodine dip these corals have received in the past week and a half. The first dip garnered amazing results on the smaller frags, but the larger colonies did not bounce back 100 percent. Hopefully this second dip does the trick or the larger Acan colony may be lost.

The Process:

Step 1: Purchase Iodine solution. The prefered choice is Lugol's solution which is available at most local fish stores, however I chose to use Tincture of Iodine 2.5% which is available over the counter at almost any drug store in the first aid section.

Step 2: Gather tools/supplies. Collect, two very clean large glass dishes, the Iodine, a towel, a timer, a turkey baster, and finally 1.5 Litres of water directly from the tank (this ensures the corals will not be shocked by different water parameters when dipped). The baster is very important because it helps to clean the corals in an unobtrusive fashion.


Step 3: Mix solution. Fill the larger dish with exactly 1 Litre of Tank water, then added 20 drops of Iodine. 20 drops/Litre is the most widely accepted iodine dip ratio using 2.5% Tincture. At this time fill the second dish with tank water only, this will be used to rinse the dipped corals.

Step 4: Dip the coral. In this case three Acan frags, and two Acan colonies were dipped. Gently place the corals into the dish
fully submerging entirely in the solution. Set a timer for 20 minutes and wait. During the 20 minutes periodically rinse the corals with the baster which will blow off any bacteria, parasites, bugs, hitchhikers, etc.

Anywhere from 15 - 25 minutes is recommended for LPS corals in an Iodine dip so naturally 20 minutes is a simple middle ground. You should see a lot of debris, pods, brittle stars, and other life falling off the rock into the dip.

Step 5: Rinse the colonies/frags. After the 20 minute dip period, the corals need to be rinsed to prevent any iodine solution or dead parasites from making it back into the aquarium. Use the turkey baster one last time in the dip solution then move the corals into the second dish. Swish the corals around for about 30 seconds to a minute and then place them back into the aquarium or quarantine tank.


Only time will tell if this second dip will save the infected colonies, in this case the first dip was apparently very effective on the smaller frags as they were growing again, but the larger colonies did not show any improvement after round one. Remember that this method is only recommended for LPS and SPS corals. It is great for ridding your colonies from red acro bugs, parasites, bacterial infections, invasive nudibranchs and other unwanted pests. Good luck and hopefully you never need to do this to save a coral.

- A.